


|
FAQ - Blender Game Engine
How do I publish my game?by blendenzoSo now that you've successfully created your first game with the Blender Game Engine, you (understandably) want to make a standalone version and share it with all of your friends. There are several steps to this process, as well as legal considerations to take in deciding how to publish and release your game, but by the end of this article you will have a game that can be played by most anyone, regardless of whether or not Blender is installed on their computer. Let's break this up into four distinct sections:
Section I.
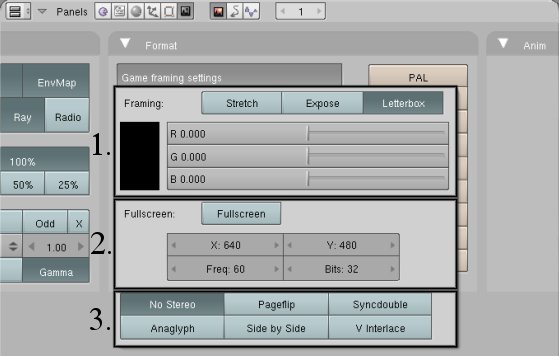
Blender "Game Framing Settings" |
|
The first group of options controls game display in the old Blender Web Plugin. If you hover over each button with the mouse, you will see a contextual description of each function pop up. When the word "viewport" is used, it refers to the actual Blender game. The word "display" refers to the display box on the webpage.
- Stretch: This option stretches or squeezes the game to fit the webpage display box.
- Expose: If the display is larger than the camera viewport, this option will cause the plugin to display more of the game than would normally be seen from the camera.
- Letterbox: This option causes the game to fit the display without stretching. Any extra space in the display is filled with bars (kind of like widescreen format movies).
- Color Sliders: These set the color of the bars used in Letterbox format.
- Fullscreen: If fullscreen is not selected, the game will be displayed in windowed mode at the specified resolution. When fullscreen is selected, the screen will be set to the specified resolution and the game will be displayed at fullscreen.
- X: This field sets the X-resolution (screen width)
- Y: This field sets the Y-resolution (screen height)
- Freq: Changing this will change the screen refresh rate during gameplay. I recommend you leave this as is.
- Bits: How many bits do you want your game to be? 32 is a good number, so you can probably leave this one alone, too.
Compatibility Tip
If you use fullscreen mode, make sure to add an extra "Exit Game" key ([End] is the default), since pressing [End] to exit a fullscreen game can cause certain computers to remain set at the game resolution.
If you use fullscreen mode, make sure to add an extra "Exit Game" key ([End] is the default), since pressing [End] to exit a fullscreen game can cause certain computers to remain set at the game resolution.
Finally, Blender also offers stereo (3D) display options for your game. The buttons in the last group each represent a different stereo display method. (I'm not familiar with all of these, so I will only cover the three that I feel qualified to explain.)
- No Stereo: (default) Stereo mode is disabled.
- Anaglyph: Enables anaglyphic stereo mode. This is the "red/blue" 3D method that requires viewing glasses with color tinted lenses. These glasses are fairly inexpensive.
- Side by Side: This mode places two images from slightly different (parallax shifted) perspectives side by side. You can view this stereo method in 3D without special glasses the same way you would view a "Magic Eye" image. That is, you may view the game in 3D either by crossing your eyes until the images converge, or by "looking through" the image (setting your focal point at some distance behind the computer screen). It is easier to hold the image by crossing your eyes, but "looking through" provides a more convincing image.
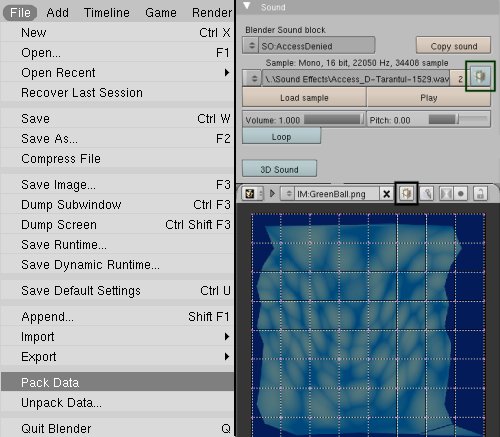
If you have used any external materials in your game (like images and sounds) you will either need to "pack your data" or gather it all into subdirectories that will be included in your distribution package. Packing data is a process in which Blender takes all external data and makes it part of the main .blend file. There are pros and cons to using this method, so you will want to weigh your options before making a decision.
At first it may seem that packing your data is more secure, and it is to an extent. Your game materials are not just "sitting out in the open" for anyone to use as they see fit. No one without a copy of Blender will be able to access them. However, you should be aware that anyone who does have a copy of Blender can unpack your data, so your materials are not truly secure. Packing data increases the file size of your main .blend file. Your entire game may only take 1MB of modelling, but include 50MB of resources! Do you want them all in one big file, or would you like them separate? It's really not much more than a matter of taste. Personally, I prefer to pack my data. It makes it harder for materials to accidentally get left out of the final distribution.
blendenzo.com Power Tip
If you decide not to pack your data, you can easily consolidate all of your external
materials into the game directory by packing the data, then unpacking it and selecting
"Write files to current directory."
Data may be packed all at once from the File menu, or each resource may be packed individually in its own respective resource window (see image below).
|
Section II.
Legal Considerations
Now that your game is ready you're probably eager to get on to publishing. Unfortunately we
need to discuss one more thing, though: legal issues. There are legal issues involved in
publishing games made with the Blender Game Engine, and you would do well to understand them,
specifically before you make the decision to compile your game into a "runtime" with Blender.
Let's try to look at those issues quickly, then we can move on to publishing.
A Note About 2.25 and Earlier...
Blender versions 2.25 and earlier NaN builds are not licensed under the GPL, but rather they are offered freely on the Blender website under their previous commercial licenses. Therefore, the following does not apply to game runtimes created with version 2.25 or any of the old NaN builds of earlier versions. (Source of information - Can I give Blender to My Co-Workers)
Blender versions 2.25 and earlier NaN builds are not licensed under the GPL, but rather they are offered freely on the Blender website under their previous commercial licenses. Therefore, the following does not apply to game runtimes created with version 2.25 or any of the old NaN builds of earlier versions. (Source of information - Can I give Blender to My Co-Workers)
Required Files
When you publish your game, you are required by the terms of various licenses to distribute a few different files with your game distribution. These files can all be found in the main Blender directory. They are "copyright.txt", "GPL-license.txt", and "Python-license.txt".
Blender, the GPL, and Your Game
As you probably already know, Blender is completely free to use, modify, and re-distribute as you please. (You can even sell it if you want!1) You may not know exactly why this is, though. Allow me to quickly explain. The Blender program, its source and its usage are all governed by what is known as the GNU General Public License (the GPL). The GPL is a document explaining how you may and may not use Blender (or any other program licensed under the GPL). A copy of it should be included with your Blender if you are interested in reading it in its entirety. We'll deal only with the relavent points here.
According to the GPL, everything you create with Blender belongs to (and is copyrighted to) you. That means all of your .blends, renders and animations are your intellectual property. Your games (as long as they are in .blend format) also remain your intellectual property. Blender runs your games using a program called the BlenderPlayer, however, and the BlenderPlayer does not belong to you. It, like Blender, is licensed under the GPL. What does this have to do with creating a runtime? Well, when you make a runtime, Blender simply packages your .blend with the BlenderPlayer into one neat little file. This is convenient for distribution but inconvenient where licensing is concerned. You see, the resulting runtime is considered a "derivative form" of the BlenderPlayer, and according to the GPL, all derivative forms automatically inherit the GPL as their governing license2. Allow me to translate this if you are having difficulty following what is being said:
The short and sweet...
If you make your game into a runtime with Blender, your game may legally be used and distributed the same way Blender is--freely. Don't make anything that you hope to maintain copyright to into a runtime.
If you make your game into a runtime with Blender, your game may legally be used and distributed the same way Blender is--freely. Don't make anything that you hope to maintain copyright to into a runtime.
In essence, making a runtime is not commercially feasible, though it is great for sending your nifty games to your friends so they can play them without installing Blender. What solution is there for someone who hopes to maintain exclusive rights over their game? Well, you have to distribute the .blend and the BlenderPlayer as separate files. That means that your .blend could be accessed by anyone with a copy of Blender. If that sounds kind of like sending a child into sub-zero temperatures in shorts and a tee-shirt, its because it is. Don't worry, though. There is some protection you can implement. Let's stop wasting time on technicalities, though. You wanted to know how to publish your game...
Section III.
Four Methods of Publishing Your Game
 Method 1 - Making a Runtime
To make a runtime, simply select "Save Runtime" from the File menu. If you are wondering, "Save Dynamic Runtime" is deprecated (out-dated). I believe that older versions of Blender packed the runtime and all necessary .dll's as one file by default. If you wanted the the runtime without the .dll's, you would make a dynamic runtime instead. Don't quote me on that, though. It might be the other way around. If you want to make various display options available to the user, you can create command line files that run the runtime with BlenderPlayer flags. For more about this, check Section 4 "Tips and Tricks".
Blender can generate platform specific runtimes for each operating system it runs on. For Windows it generates .exe files, on Linux it makes binaries, and on a Mac it makes whatever it is that less than 1% of the world population runs. (Calm down...it was a joke;) With whichever Blender you use, you can only make a runtime for your specific platform. If you run Windows and you want a Linux binary, you'll need to contact a Linux user and ask them to compile it for you. (We'll cover an easier multi-platform option later.) As we've seen, however, compiled runtimes are public property, so you should be careful only to create runtimes of games you wish to have publicly distributed.
Something to consider...
Maintaining exclusivity is not the only reason you might want to choose another option. You
should also take into consideration the issue of redundancy. Imagine you have a game that
consists of five separate .blend files, and you compiled each into a runtime. That's five
separate copies of the BlenderPlayer! It would make more sense instead to use only one
copy of the BlenderPlayer and run it on each file by using five command line prompts.
Method 2 - Running Your .blend with the BlenderPlayer
Many Blender users are hoping to sell their games commercially some day or may not want others freely using and distributing their files. Because of this, having their game GPL'ed in a runtime is not an attractive solution. Thankfully, the BlenderPlayer can easily run .blend files stored separate from it. Since I use Windows, I'll be explaining how to do this in Windows, though the concept should be easy enough to duplicate in other operating systems if you are familiar with the basics of running programs from the command line (also called console or terminal).
To begin with, place your .blend, the BlenderPlayer, and any required .dll's all in one directory. Now open notepad and type in the following command line prompt and save the text file (in the same directory as everything else) as "MyGame.bat": (Note that for this example we will be using an imaginary .blend called "my.blend". You should replace this with the real name of your .blend file)
MyGame.bat
blenderplayer.exe myblend.exe
That's all that's required to run your .blend with the BlenderPlayer. The BlenderPlayer will automatically detect the game framing settings from your .blend and display everything just as it would be displayed in a runtime. Just as with runtimes, you can also offer custom display options by using the BlenderPlayer command line flags. Also, your .blend can be "locked" for extra security. (See Section 4 "Tips and Tricks" for both.)
Method 3 - Using L0GAN's BlenderStarter Script (Multi-Platform)
L0GAN (with a zero, that is) has kindly made available a script called " BlenderStarter" that automatically generates command line files for the three major operating systems (Windows, Linux, and Mac OSX). The BlenderStarter site contains a tutorial on using the script.
Method 4 - Publishing on the Web
Games compatible with Blender 2.25 can be published to the web using the Blender Web Plugin. The web plugin is available for IE, Netscape, and Mozilla browsers. Beta support is also offered for users of the Linux and FreeBSD operating systems. Use of the Blender Web Plugin seems to have diminished as Blender has moved farther away from version 2.25, yet it is still a functional and capable way of publishing your game, and it is currently the only way to publish to the web with cross-browser support.
In order to put your game online, you should first set the web plugin game framing settings (see Section 1). Once you have done this, you simply need to add the following to the body of your HTML code: (Again, replace "my.blend" with the actual relative URL and name and of your game)
HTML Code for Running the Web Plugin
< OBJECT classid="clsid:5DB05CB8-7751-469D-A1DD-45C8C201C013"
codeBase="http://download.blender.org/release/plugin/Blender3DPlugin.cab#Version=2,25,4,0" id="BlenderPlayer" width="480" height="450">
< param name="blenderURL" value="my.blend">
< EMBED
type="application/x-blender-plugin"
PLUGINSPAGE="CONST_PLUGINSPAGE"; name="NPBlender"
width="480" height="400" src="my.blend">
< /EMBED>
< /OBJECT>
Useful Links
Method 4b - The 2.42 Web Plugin Alpha 0.2
An important note...
As it stands, it seems to be "one or the other" as far as using plugins go. From looking at the "classid" entries, you can see that the new plugin takes the place of the old one. The new plugin does not have correct support for the old physics system, so games intended for the 2.25 plugin do not display properly.
As it stands, it seems to be "one or the other" as far as using plugins go. From looking at the "classid" entries, you can see that the new plugin takes the place of the old one. The new plugin does not have correct support for the old physics system, so games intended for the 2.25 plugin do not display properly.
Erwin Coumans (the same man responsible for bringing us Bullet physics) has recently released an Alpha testing version of the new 2.42 Web Plugin with Bullet physics (the old plugin uses Sumo physics). Currently, the new plugin is only available for Internet Explorer. Read more and download the plugin at Erwin's site. To embed 2.42 content in your page, use this code:
HTML Code for Running the Web Plugin
< OBJECT
classid="clsid:5DB05CB8-7751-469D-A1DD-45C8C201C013"
id=BlenderPlayer1
width = 640
height = 480>
< PARAM NAME="blenderURL" VALUE="my.blend">
< /OBJECT>
classid="clsid:5DB05CB8-7751-469D-A1DD-45C8C201C013"
id=BlenderPlayer1
width = 640
height = 480>
< PARAM NAME="blenderURL" VALUE="my.blend">
< /OBJECT>
Work in Progress.... Check back later for update
Section IV.
Tips and Tricks
Using Flags with the BlenderPlayer
Endnotes
1. From the preamble of the GPL v2: "When we speak of free software, we are referring to freedom, not price. Our General Public Licenses are designed to make sure that you have the freedom to distribute copies of free software (and charge for this service if you wish)."
2. From Section 2 of the GPL v2: "...when you distribute [identifiable] sections [of the Program] as part of a whole which is a work based on the Program, the distribution of the whole must be on the terms of this License, whose permissions for other licensees extend to the entire whole, and thus to each and every part regardless of who wrote it."
Website design by Tony "blendenzo" DiRienzo. All content © copyrighted to its repsecitve author.