 |
|||||||||||||
| News | Tutorials | Games | Downloads | Links | Contact | ||||||||
 |
 |
|
 |
||||||
Featured Author: -blendenzo-
|
Tutorials - Blender Game Engine
Using Custom Cursorsby blendenzo, with special thanks to Social and PiraniacExample file: customCursor.blend Version Info: Blend made with 2.42a. Compatible with v2.34 and up. Requirements: Basic knowledge of Blender GE interface and ability to "plug in" a pre-written Python script Helpful Knowledge: UV Mapping Step 1 - Setup Generally speaking, it is best to setup your custom cursor on an overlay scene (since it avoids potential problems related to camera movement). Begin by adding a new empty scene and naming it "CursorOverlay". Now add logic bricks in the main scene to intialize the overlay scene. I like to put this type of logic on the camera. Make sure you turn off "Positive Pulse Mode" on the Always sensor. 
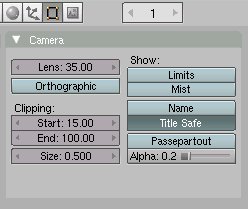
Switch to the "CursorOverlay" scene and add a camera. In the Edit context of the buttons panel [F9], set the camera's "Clipping: Start" value to something larger. 15 should work. 
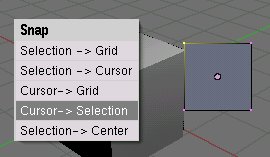
In camera view [Numpad 0], add a new plane (this will cause the plane to be facing the camera). Move the plane about 20 blender units away from the camera and resize it to look good. You'll probably want to add a nice custom cursor texture at this point. Crosshairs should be centered on the plane. If you are using a pointer type cursor, make sure the point is at the top left corner of the plane. Note: If you are using Blender Materials, there may be some strange lighting on the cursor. To fix this, assign a material to the cursor, set it to "Shadeless" and give it a texture layer mapped to UV. Assign your cursor image to the texture layer. Step 2 - Centering the Cursor (Pointer type cursors only. Crosshairs skip to step 3.) Enter edit mode [Tab] on the plane and select the top left vertex. Press [Shift-S] over the 3D viewport and select "Cursor to Selection" from the pop-up menu. 
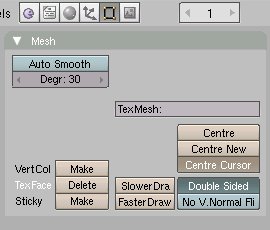
Now return to object mode [Tab] and go to the Edit context of the buttons window [F9]. Click "Center Cursor". 
You should notice that the object center (represented by a pink dot) has moved to the upper left corner of the plane. 
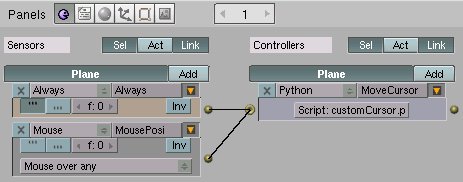
Step 3 - The Script (Social's Modified Version) Copy this script and paste it into the Blender Text Editor (use [Ctrl+Shift+V] to paste from the system clipboard) or download it here. Name the script "customCursor.py" With the cursor selected, go to the Logic context of the buttons window [F4]. Add two sensors and one controller. Leave one of the sensors an "Always", but make the second one a "Mouse Over Any" and name it "MousePosi". Set the controller to "Python" and set the script to "customCursor.py". 
You will also need to add a property named "init" and set it to a value of 1. (This is the property used by the script to center the mouse on the game screen at startup.) 
Conclusion It's that simple. Press "P" and watch it work. You'll notice that the cursor follows the movement of the mouse precisely, regardless of window size or camera bounds. If necessary, resize your cursor to make it look good in game and your done. Enjoy, -blendenzo Back to the tutorials index... |
|||||
|
|
||||||
 |
||||||
Website design by Tony "blendenzo" DiRienzo. All content © Copyright Tony DiRienzo unless otherwise noted.