 |
|||||||||||||
| News | Tutorials | Games | Downloads | Links | Contact | ||||||||
 |
 |
|
 |
|||||||||||||||
Featured Author: -marvo- |
Tutorials - Blender Game Engine
Making a Basic Menuby marvo (Blender v2.42a)Download the Materials used in this tutorial (109kb, zip). Ok, here it goes. A tutorial on making menus. By the end of the tutorial, you should be able to make a menu and expand it further in your project. The type of menu I'll be showing how to make is a point and click button menu.
This tutorial was made in Blender 2.42a Make sure you save after every step! Turn blender materials 'off' for this tutorial. 1. The first thing you have to do is open blender (of course) and delete the standard cube and camera. Then next thing to do, is go into "front view" mode and add a camera. (becuase its faster, save questions for later...)
Ok, before I move on, I'd like to explain how the menu works. At the main menu, when I click a button, I have it so that the sub menu that opens up is in a different scene. So the logic for that would be: (roughly) [Mouse left click]-------->[AND]-------->[setscene] So each submenu is a different scene. I might have Main, High scores, About, etc. Each is its own scene. For this tutorial, well have: Main, Credits, Stuff, (well get back to that later ) 2. Then next thing that needs to be done is to split the view. To do this click the bottom of the top header with the middle mouse button and select 'split area'. Now set the new area to the 'text editor'. Now click the little button with the two vertically pointing arrows on it and slect "ADD NEW". Insert this code:
Python Code:
import Rasterizer
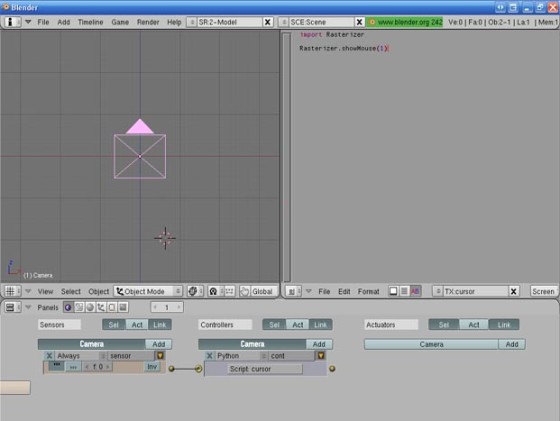
Name it cursor. Now select the camera and go into the logic panel (little purple pacman button). Add an 'Always' sensor, and connect it to a 'Python' controller'. Now type the name of the script in the Python controller(cursor) like so:
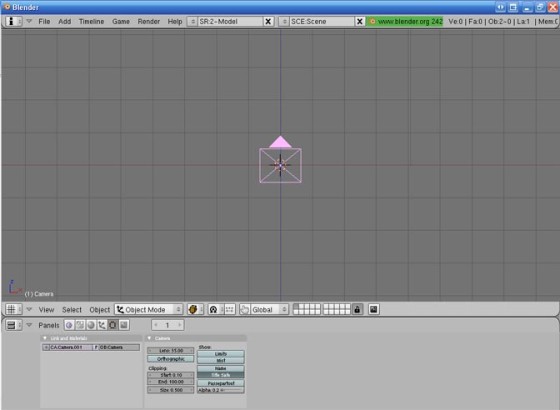
Now when you start the game engine, the pointer will appear. 3. Now its time to start what I like to call the "meat" of the menus (the buttons and stuff). Add a plane just a little bit in front of your camera. Make sure its centered. It doesn't have to be perfect, nope. Well fine tune it in camera view mode in a second. So after adding a plane, you should have this:
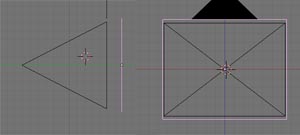
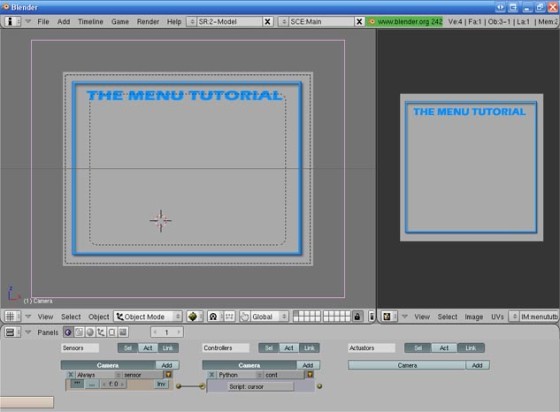
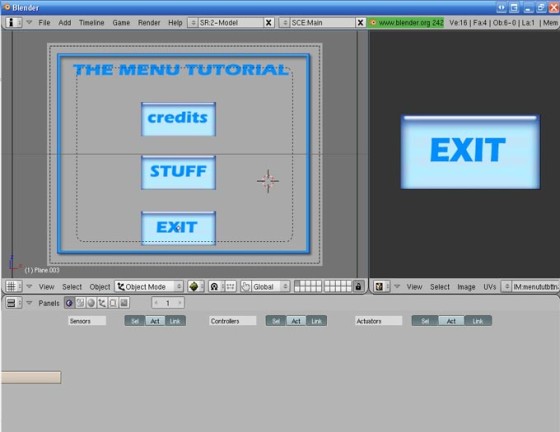
The pink rectangle is the selected plane (if you havent figured that out yet). Now go into camera view mode. You see the two dotted rectangles? sure you do. Select the plane thats just infront of the camera and resize it so its just a little bigger than the outer dotted rectangle. This rectangle will be the background for the Main menu. You can put whatever texture you want on there. I'm going to go ahead and use the one in the materials download. Its nothing special, but it does the job for the tutorial. Before we move on, rename this scene "Main" (minus quotes) 4. TIME FOR BUTTONS!! REJOICE!... ok maybe you're not as enthusiastic as I am, but that's ok... This is what you should have so far:
The first thing you should do at this point is make a texture for a "Credits" button. You could just use mine if you want. It's included in the materials download. Now, add a plane just in front of the background plane (toward the camera). This plane is going to be the button so center it and make its smaller. Texture it with your credits texture. We want it(for this tutorial) so that when the pointer is hovering above the button, it enlarges slightly. So we need to make an ipo animation set to flipper. The animation is two frames. On frame one, press the [i] key to bring up the ipo options. (make sure the button is selected). Select "Scale." Now move the frame to 2 and enlarge the button a little bit. Press [i] , then select "Scale" again. Now to set up the logic:
This means that when the mouse is "over" the button, then the ipo animation will play. The next step is to duplicate that button two times. These two buttons will be the "Stuff" and "Exit" buttons. Just place them under the credits button, or wherever, it doesnt matter. Now it's time to make textures for the two new buttons. If you're using my textures, you can find the "Stuff" and "Exit" buttons in the materials download. 4. Time to make the submenus! heres what you should have so far:
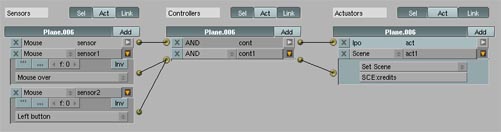
Now we have to make another scene for the "credits" submenu. Click the button witht he vertical arrows next to the scene name and select "ADD NEW" then full copy. Rename the scene "credits". Then go back to Main menu scene. Select the credits button. We want the button to trigger when the pointer is "over" it and the left mouse button is clicked. And when that happens youre sent to the credits submenu scene. So the logic is setup as follows: 5. Time to make the submenus! heres what you should have so far:
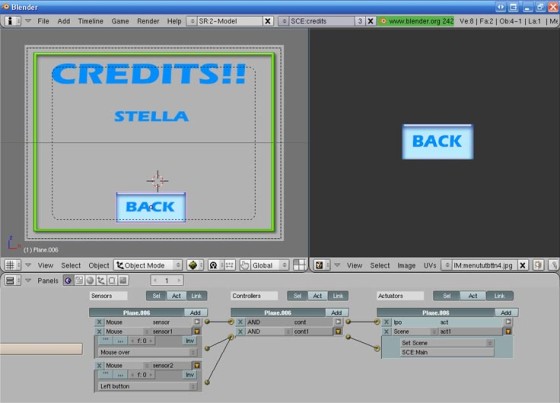
So if you run the engine, and click on the credits button, you should be taken to the credits scene. BUT WAIT! It looks the same! We have to do something about that. The only button you need in that scene is a "back" button to take you have to the main menu once youre satisfied with what you have seen. Use the one in the download. So now youre in the credits scene. Delete the "stuff" and "exit" buttons. Apply the "Back" texture to the "credits" button. Now in the logic, change the set scene actuator scene to "Main" (no quotes), or whatever you named the main scene. So now when you click that button, it should take you to the main menu again. Still need to change the background to something credits...y? You'll find a credit's background in the download. Ok, so now that you've done that, here's what the credits scene should look like:
We still have that stuff button on the main menu... its pretty simple now since you know how the credits button works. While in the 'credits' scene, add a new scene -> full copy. Name it "stuff" (no quotes). In that scene, simply change the background to the one included in the download. Go back into the Main scene and select the "stuff" button. copy all of the logic from the credits button to the stuff button. Only for the set scene actuator, put "stuff" (no quotes!), instead of "credits". This way when you click the stuff button, youll be taken to the stuff screen.
blendenzo.com Power Tip!
To copy logic bricks quickly from one object to another, select the object or objects that
need the logic bricks, then (keeping those selected) select the object that has the desired
logic. Press [Ctrl+C] and select "Logic Bricks" from the menu. This is much easier than
setting up logic bricks over and over again for identical/similar objects.
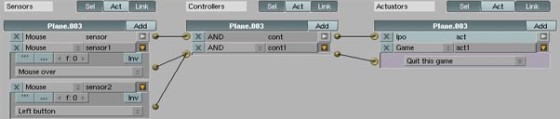
ALMOST DONE! Just gotta take care of that pesky little exit button. Copy all of the logic from one of the buttons on the main menu to it. Instead of having a scene actuator, replace it with a Game actuator and select "quit this game".
Well.... that completes it. You've just created a very very basic menu with buttons! Instead of switching to a new screen when you click a button, you can have it take you to the scene with your game. If you have any questions, post them in the BlenderArtists thread for this tutorial. Back to the tutorials index... |
||||||||||||||
|
|
|||||||||||||||
|
|||||||||||||||

Website design by Tony "blendenzo" DiRienzo. All content © Copyright Tony DiRienzo unless otherwise noted.